If you’re looking for new ways to repurpose content, you’ve come to the right place. This month at Interact, I’ve been reviewing different AI platforms to explore creating videos using existing content. If you’ve been following, read on for my latest review of this video editing tool where you can use Pictory’s AI to turn blog posts into short video clips. If you’re new here, welcome!
Make sure to check out my reviews for using Lumen5’s AI to convert blog posts into short clips, and Munch’s AI to turn long-form videos into YouTube shorts.
One thing I liked about Lumen5 was that after I simply copy-and-pasted a link to my blog post, Lumen5’s AI created a video outline for me to edit and then post on YouTube. Of course, it took some revising, but it was super easy to do and drew more attention to content I’d already published.
As I’ve been testing various AI platforms, I noticed that Lumen5 does not allow me to create a story-sized video. So, in this post, I’ll use Pictory’s AI video editing tools to repurpose a blog post into a short clip.
Let’s get going!
Getting Started with Pictory
I chose to review Pictory’s AI because I can resize my video into a vertical story size and post it as a YouTube short.
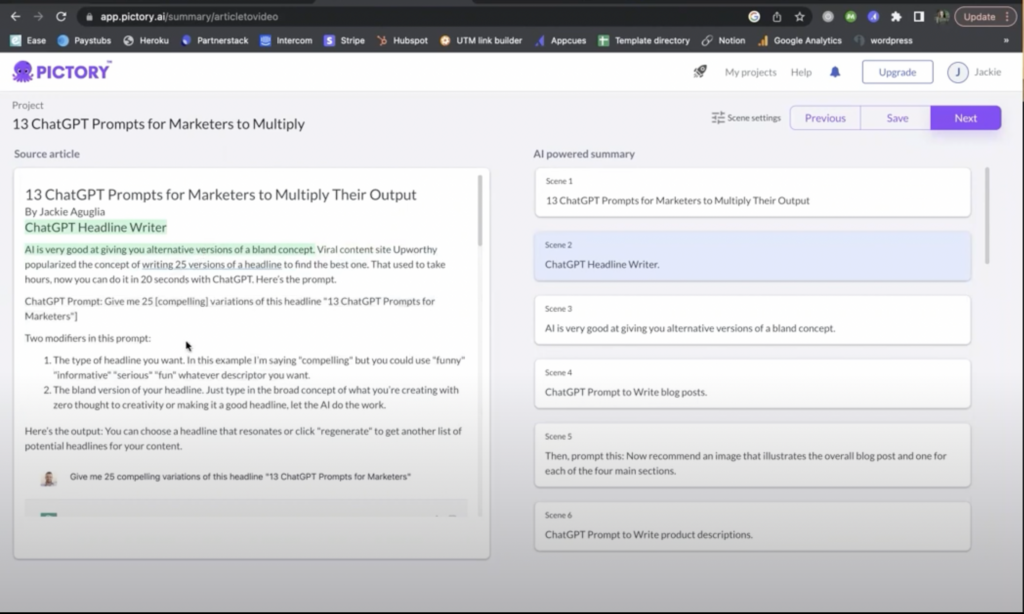
The first thing I did was sign up for a free trial. Next, I’ll paste the link of the blog post I want to repurpose in the “Article to video” box and click “Proceed.”

As the content converts, Pictory’s AI extracts key messages from the blog post. I know there are specific topics and headers within my blog post that I want to use, but so far in my research, AI has been able to call out this text because it’s formatted differently in the blog post.
Once the content fully uploads, you’ll see your blog post on the left side of the screen. On the right side of the screen, Pictory provided what I’ll call a “script” or “outline” of what I’m creating. Lumen5’s AI video editing tool did the same thing.
What Lumen5 does differently, is it shows the imagery the AI chose directly in the outline on the right. Pictory presents the text first, so I won’t see the imagery until after I finish editing the text. If you’re focused on the actual content, Pictory might be better for you, knowing you can make the video prettier in the next section. In Lumen5, you’re editing both simultaneously, which makes more sense for my purposes.
As I’m reviewing what Pictory’s AI came up with, I see that the program pulled the “scene” headers directly from the blog post, which I expected.

I don’t think these titles will be as compelling in a video format, though. Rather than just list the thirteen GPT prompts, I’ll instead use text to tell users why they should use them. So, I’m going to scan my original blog content on the left side of the screen to see what else I can use.
I found text I like better to title “scene 2.” To change out the text in Pictory, click on the slide on the right to select it, then highlight and double-click on the text you want to replace it.
This used to take me hours, and I just did it in about twenty seconds with chatGPT.
Quick tip: If you’d like to reorder your scenes, just drag and drop them.
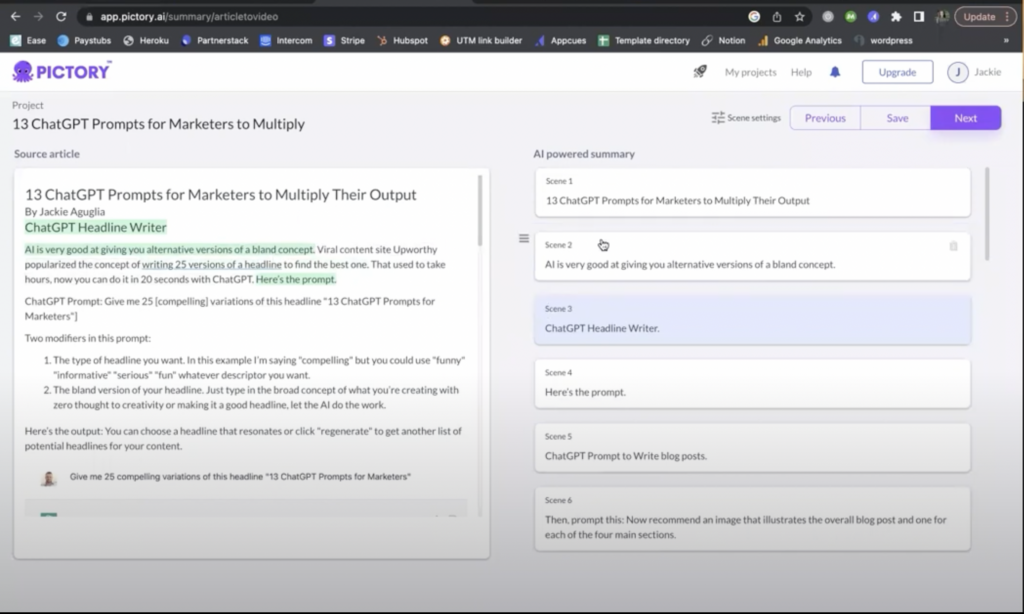
My preference is to keep my video short and sweet, and the AI came up with quite a few prompts for me, so I’m going to delete most of them. Unfortunately, I don’t see a bulk delete option, but I can delete the scenes one at a time by hovering over each one and clicking the delete icon that pops up.

Once you finish editing the scene text, click “Next.”
Get Creative with Your Pictory Video
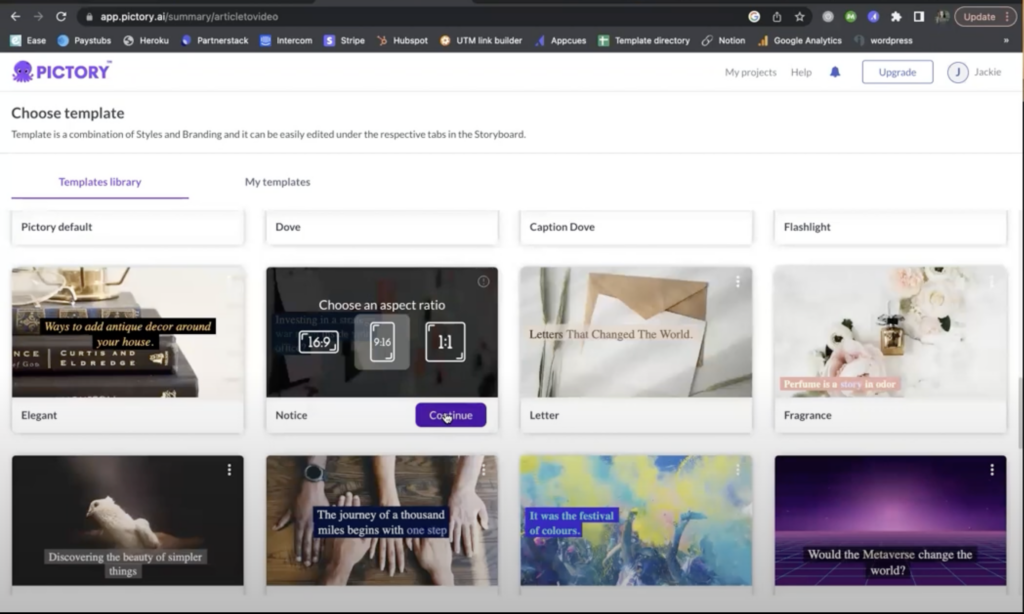
Now it’s time to choose a template from Pictory’s template library. I’m going with the “Notice” template.
Next, I’m prompted to select an aspect ratio. I’m picking the 9:16 ratio because this is what I need to make a YouTube short. And I know I’ll be able to edit the photos later on.
Note: In Lumen5, I could only select a 1:1 or 16:9 aspect ratio.
After you select your aspect ratio, click “Continue,” and Pictory will generate a version of your scenes that includes the graphics that will make the video.

Off the bat, I see I want to make the text bigger in my video. To do so, I’m just highlighting the text and playing around with different font sizes and colors using the toolbar just above. I’m moving the text box around a bit, too, and revising the text again right in the text box.
You can add a subtitle and body text to each slide by clicking “Text” from the toolbar on the left-hand side of the screen.
Next, I want to change the background color behind my text on slide 1. To do the same, click “Visuals” from the toolbar on the left. I always recommend using your brand colors. You’ll have to go through and change the colors on each slide one at a time.
Pictory’s free trial allows users to use their brand colors in the free trial, but Lumen5 does not.
I’m going through all my slides and swapping out videos that don’t quite work. If you select the background, you can move the videos around a bit, too. This is great if you want to highlight a specific area.
I’m searching in the video library for a “happy person” to add—because they just saved hundreds of hours using AI to repurpose content!
Note: In the free plan, the quantity of images you can use is limited in Pictory. You’ll have to upgrade to another plan if you want to use more than the given amount.

Now it’s time to add your creativity to the project. It’s super easy to revise in this format. I’m going through my slides again to clean them up and match everything to my brand colors. If you want to change the text at this point, click on “Story” in the left-hand toolbar.
Once you go through all your slides and are happy with how they look, click “Generate.”
So there you have it! I repurposed existing blog content to create a short clip using Pictory’s AI video editing tool. Now I’ll go ahead and post my new video to YouTube shorts.
That’s a wrap
Now you know how to use Pictory’s AI to turn blog posts into short clips. If choosing between Lumen5 and Pictory, consider the pros and cons of each.
You’ll need Pictory for the vertical image size if you’re posting a story, like YouTube shorts. But I like the UI better in Lumen5. Both free plans have access to a good amount of features, but I recommend signing up for the paid plan—no matter which program you choose—so you can take advantage of the paid features as well.
Check back at Interact to see how both the Lumen5 and Pictori videos perform. I’ll be sure to include updates on the analytics.
If you have any questions or if there’s another AI platform you’d like us to review, just let us know!